Build Your First Custom Widget in Bonita UI Designer
A web developer always wants to have just the right widget handy — and sometimes they have to create their own when they can’t find just the right one among the widgets provided.
by Bishal Thalpaliya, Bonita R&D Engineer & front end developer
This article is to help new Bonita users especially, but is for anyone who wants to learn how to create a custom widget in Bonita UI Designer. In this article, I am going to explain how to create a custom Hello World! widget to use on our application page.
Prerequisite
Bonita Studio must be installed on your computer to launch the Bonita UI Designer. You can download Bonita Studio from here.
Step 1
- In the Bonita UI Designer home page, click on the Create button.
- Choose Custom widget in the Type section.
- Define a name for the widget (eg. HelloWorldWidget).
- Click on Create.
- The editor window for the widget “HelloWorldWidget” will appear.

A custom widget is composed of six different sections: Description, Template, Controller, Assets, Required angular modules, and Properties. Since we are creating a simple custom widget to display a “Hello World!” text, we will make some modifications in the Template section only.
Step 2: Edit
- First, remove everything from all the sections.
- Now, our widget editor window looks like this:

Step 3: Create a template for the widget
In the template section, we write the HTML for the widget we want to build and it will be shown to the end-users when we see the preview.
- In the template section, write the following HTML code;
HTML
<h2>Hello World!</h2>Note: The <h2> tag creates a second-level heading in the HTML document.

- Click on the Save button.
Step 4: Use the HelloWorldWidget into an application page
- In the Bonita UI Designer homepage, click on the Create button.
- Choose the Application page in the Type section.
- Define a name for the page (eg. HelloWorld).
- Click on Create.
- A page editor window will open.
- Click on the custom widgets tab on the left.
- We can see now that HelloWorldWidget appears in the list.
- Now, drag and drop the HelloWorld widget onto the whiteboard.
- Set the width property to 12 columns.
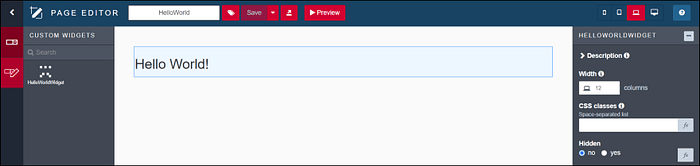
- Click on the Save button.
- Click on the Preview button to see the output.
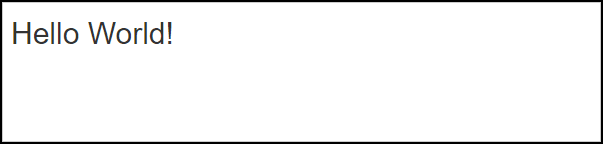
Output
We can now see Hello World! with a second-level heading format in the preview.
Now that you can create a simple custom Hello World! widget easily. In my other article, I have explained how to create a custom search widget, how to change the look and feel of a custom widget that appears on the whiteboard, and a pro tip on how to change the custom widget icon when it appears on the list. The custom search widget will be the same as shown in the image below. Click here to learn about building a custom search widget in Bonita UI Designer.

Stay tuned. Have fun with Bonita!